Cool down with these refreshing Green Tea Hibiscus Pops, because the only thing better than iced tea is FROZEN tea!

Starbucks has this super tasty tea on the menu called “Iced Passion Tango” and I puffy heart it. Big time. As a treat, I’ll order it from the coffeebucks section of Target and sip while I shop. In reality the ordeal is less sipping and more chugging because the second my toddler gets ahold of it, there’s no getting my bevvy back. Girlfriend is obsessed with any and all things hibiscus and green tea. Unsweetened even!
Atta girl!
Since our taste in beverages is very much aligned, and since it’s hotter than Hades outside, we decided to turn our tea-time treat into a frozen pop. A brilliant idea that resulted in nearly 5 hours of toddler-induced harassment while we waited for the pops to freeze. I think at one point she grew tired of waiting and tried to put me in time out.
Luckily we both agreed they were well worth the wait!
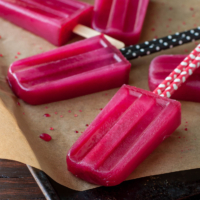
Care to join us? All the cool kids are freezing their tea! (pun intended) Also, that COLOR! They’re so vibrant and fun and, to the chickpea’s delight, shockingly pink!


My daughter, aka Peas and Crayons taste tester extraordinaire, insisted she must run quality control on this batch of Green Tea Hibiscus Pops right away, before a single photo may be taken.
After she giddily devoured the pop and gave me a high-five for making her the most beautiful pink pop she ever did see, this mama got to work… FAST!
Have I mentioned how hard it is to photograph ice pops? Holy COW those babies like to melt, especially in this heat. I cranked the AC, cringed over my impending electrical bill, and started snapping, hoping the photos would do these super vivid pops justice.


Green Tea Hibiscus Pops
Let’s get our popsicle on!
Have fun with it — paper straws make a fun and interesting pop handle. Match them to your party decor or snag a few bold patterns! I use two side by side to keep them sturdy + functional! ??
Hibiscus-pomegranate blends and hibiscus-passionfruit blends are also super popular and easy to find, feel free to snag one of those as well if you come across it! I’ve even seen one that is a mix of hibiscus and peach that sounds simply phenomenal. Snag whatever looks amazing to you and have fun with these frozen tea pops!
Green Tea Hibiscus Pops
Ingredients
- 24 oz water
- 2 green tea teabags
- 2 hibiscus tea teabags
- ¼ cup sugar
- ¼ cup fresh pineapple juice
- juice of 1 lime
TOOLS NEEDED:
- 10 pop mold
- 10 popsicle sticks
Instructions
- Bring water to a boil.
- Add hibiscus tea bags and steep for 10 minutes, adding the green tea bags at the 8 minute mark.
- Remove tea bags and stir in sugar until dissolved.
- Add pineapple and lime juice and allow mixture to cool.
- Using a funnel or a measuring cup with an easy-pour spout, pour the tea into a 10-pop mold.
- Leave a little bit of empty space at the top of each pop mold, pops will expand when they freeze.
- Freeze until solid: Approx. 5 hours or overnight.
- If your mold uses a lid and wooden sticks, you can allow your pops to partially freeze, uncovered, for about an hour, then add the lid and carefully insert the sticks. The partially frozen slush will cradle the stick and help you keep it straight for easy removal. This method is great because you can also place the sticks more on the shallow side this way, allowing more of a handle for little (or large!) hands to grip.
- EASY REMOVAL: To remove pops from even the most stubborn sticky situation, fill an extra large bowl with water and lightly dip your pop mold into the water, steering clear of the top so you don’t submerge it. Pops will come out clean and easy and can go through a “second freeze” (see storage tip below) to make them extra firm and less likely to melt all over you.
Notes
Nutrition
Now here’s a little recap of my frozen pop tips, tricks, and shenanigans!
Frozen Pop Tips + Tricks
You can make frozen pops with literally anything you have on hand: fresh fruit, frozen fruit, and juice all work great. We’re loving our Tropical Fruit Pops and these Green Tea Hibiscus Pops!
You’ll need more liquid ingredients if using frozen fruit and less for fresh. Start with just a little and you can always add more as needed. Have fun experimenting!
Frozen ingredients expand, so make sure you leave a little space at the top of your pop mold to prevent the lid from sticking or from messy overflow. Usually 1/4 inch of spaces will cover it.
To ensure the sticks stay upright and don’t migrate, I freeze the pops uncovered, for about an hour, then carefully insert the sticks. The partially frozen slush will cradle the stick and help you keep it straight for easy removal. You can also place the sticks more on the shallow side this way, allowing more of a handle for little (or large!) hands to grip.
To remove pops from even the most stubborn sticky situation, fill an extra large bowl with water and lightly dip your pop mold into the water, steering clear of the top so you don’t submerge it. Pops will come out clean and easy and can go through a “second freeze” (see storage tip below) to make them extra firm and less likely to melt all over you. Less stubborn pop molds can simply be run under warm water for easy release.
Storage + Freezing
Once you remove your pops from mold, individually wrap in baggies or in a tight layer or two of plastic wrap and freeze for an additional 30 minutes. The second freeze helps set the pops so they don’t melt immediately when you start eating them. Wrapped pops may be stored for a few weeks and are SO much cheaper than store bought!
I hope y’all love these Green Tea Hibiscus Pops as much as we do!
NEW Recipes on P&C:
- Tropical Mango Pineapple Strawberry Swirled Fruit Pops
- Buffalo Chicken Taco Salad <— OMG!
- Maple Almond Granola Bowls
- Strawberry Guacamole Toast (a little strange but oh-so-tasty!)


Questions & Reviews
I just made these and wow they’re so refreshing and delicious!! Perfect for my horrible morning sickness.
Thank you Emma! I had awful morning sickness too and can totally relate — hope you feel better soon! xoxo
My friends adored these popsicles! They were perfect over the 4th holiday.
These popsicles are so much fun and perfect for the summer! I love the flavor of the hibiscus – So refreshing!
Thanks Christine!
Oh my these looks so wonderful. Great summer treat for my children and myself. I don’t think I will be able to wait till summer to make these however.
Looks yummy and I love the way you used the straws. Hibiscus tea is one of my favorites, can’t wait to give these a try.
These look great! I love how these pops look. I’ve been nervous about making popsicles, dunno why, but i think I’ll give these a shot! 🙂 love how you used straws
Thanks Hayley – I hope you love them! I was super intimidated at first too and didn’t start making pops until I had my daughter and she needed a teething snack. Now a few years have passed and we’re pop-addicts! They’re way easy and so simple to customize too! <3
These look delicious! Thanks for the recipe 🙂
🙂 Hope you get a chance to try them Bethany, thanks!
These are eye popping!! Love all your tips, too, especially the one about the ‘second freeze’ — thanks!
Thanks Sue! <3 Your pops are always so beyond gorgeous!