An easy-to-follow homemade sushi tutorial with lots of tips, tricks, and photos to help you roll like a pro along with sushi roll and sauce recipes galore!
Homemade Sushi: Tips, Tricks, and Toppings
Let’s dive right in! It may seem like a lot to buy at first, but most of the ingredients turn into staples [like sriracha + sesame seeds] and non perishables like nori, sushi rice, and vinegar will last a ridiculously long time in your pantry. You’ll end up with 4-6 sushi dinners for the price of one at a restaurant. But above all else, it’s really fun! Invite a few friends over and go nuts.
As a bonus, this is one of the few times it’s socially acceptable to say “Here’s everything you need, now make your own dinner!” Set out all your ingredients and let your friends & family create their own rolls!
I’ll walk you through each step in the post and then include a printable cheat sheet at the end to make your new sushi adventure even easier!
Don’t get intimidated – rolling sushi is 100x easier than it looks! Your rolls might not come out 5-star restaurant worthy on the first try but it won’t be long before you’re creations are so pretty you’ll want to instagram them!
homemade sushi staples:
- sushi rice (Nishiki is my brand of choice!)
- a bamboo mat (example)
- plastic wrap
- nori (seaweed sheets)
- low-sodium soy sauce
- toasted sesame seeds and/or chia seeds
- sriracha chili sauce
- wasabi + pickled ginger (optional but yummy!)
You can pick up your staples at your local asian food market or in your grocery store’s international food aisle. Nearly every store I’ve been to carries all the above ingredients and some even arrange them next to the store-made sushi for easy stock-up! Sweet!
Once you have your pantry staples, all you’ll need is some fresh produce!
Some of my favorite veggies for homemade sushi rolls:
- cucumber
- avocado
- asparagus
- jalapeño
- green onion
- carrots
- yuca
- sprouts
- lettuce
- bell peppers
- red onion
- radish
- sweet potato
Fruit-wise, pineapple, mango, apple and pear are all insanely good.
As for protein options? Anything you’d like! I typically use shrimp tempura and/or sashimi grade tuna, since that’s what’s available near me. When I lived in Virgina I was able to get fresh salmon from local Asian markets, but here in coastal NC my options are limited. You can also add tofu or cream cheese to the rolls if you’d like!
Be creative and add anything that floats your sushi boat.
step 1 – make the rice:
Combine 1+1/2 cups of rice with 2 cups of water in a medium sized pot and bring to a boil. Once the water begins to boil, reduce heat to low and cover. Let the rice simmer for 20 minutes, stirring every 5 minutes or so. Remove from heat after 20 minutes but let the rice stand, covered, for 10 minutes or so to ensure that the rice is fully cooked. The best way to ruin the sushi is to roll it in crunchy rice. I have TOTALLY done this before — whoops! A taste test will ensure that your rice is perfectly fluffy.
Feel free to use a rice cooker or (click here) for shortcut sushi in under 2 minutes; quinoa also makes an excellent substitute for rice!
Cooking the rice is the only time-consuming part of the entire process. While it cooks, save time by prepping your fish, veggies, and sauces!
step 2 – season the rice:
If you don’t already own rice vinegar, feel free to opt for the pre-seasoned variety to save yourself a step. If you already have a bottle of rice vinegar or have white vinegar on hand, simply season with salt and vinegar to taste. For the rice measurements above you’ll need 1/3 cup of seasoned rice vinegar or 1/3 cup of vinegar seasoned with one teaspoon of sugar and 1/2 teaspoon of salt. Pour over your rice, fluff with a fork, and taste. Adjust salt/sugar as desired. Remove rice from heat, add to a bowl and cover with a paper towel.
step 3 – julienne your veggies:
While the rice cooks + cools – prep your veggies! Slice vertically into matchsticks and set aside. Once the rice is done you’ll be ready to roll!
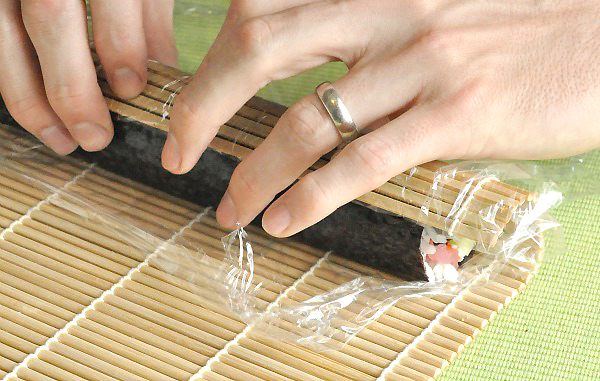
step 4 – wrap it up:
To avoid messy clean-up and scrubbing, wrap your bamboo mat in plastic wrap. Lay a sheet of nori on top and grab your rice!
step 5 – inside-out or outside-in:
The two most popular techniques are inside-out rolls with rice on the outside or rolls wrapped with nori on the outside and rice on the inside.
Since it’s easiest to make rolls with seaweed on the outside, that’s what we’ll start with for this homemade sushi tutorial! Grab a spoon and spread a thin layer of rice on the seaweed sheet. For large rolls, add an extra layer. I like my pieces bite-sized, so I add a thin layer and leave a little extra space at the end. Totally up to you!
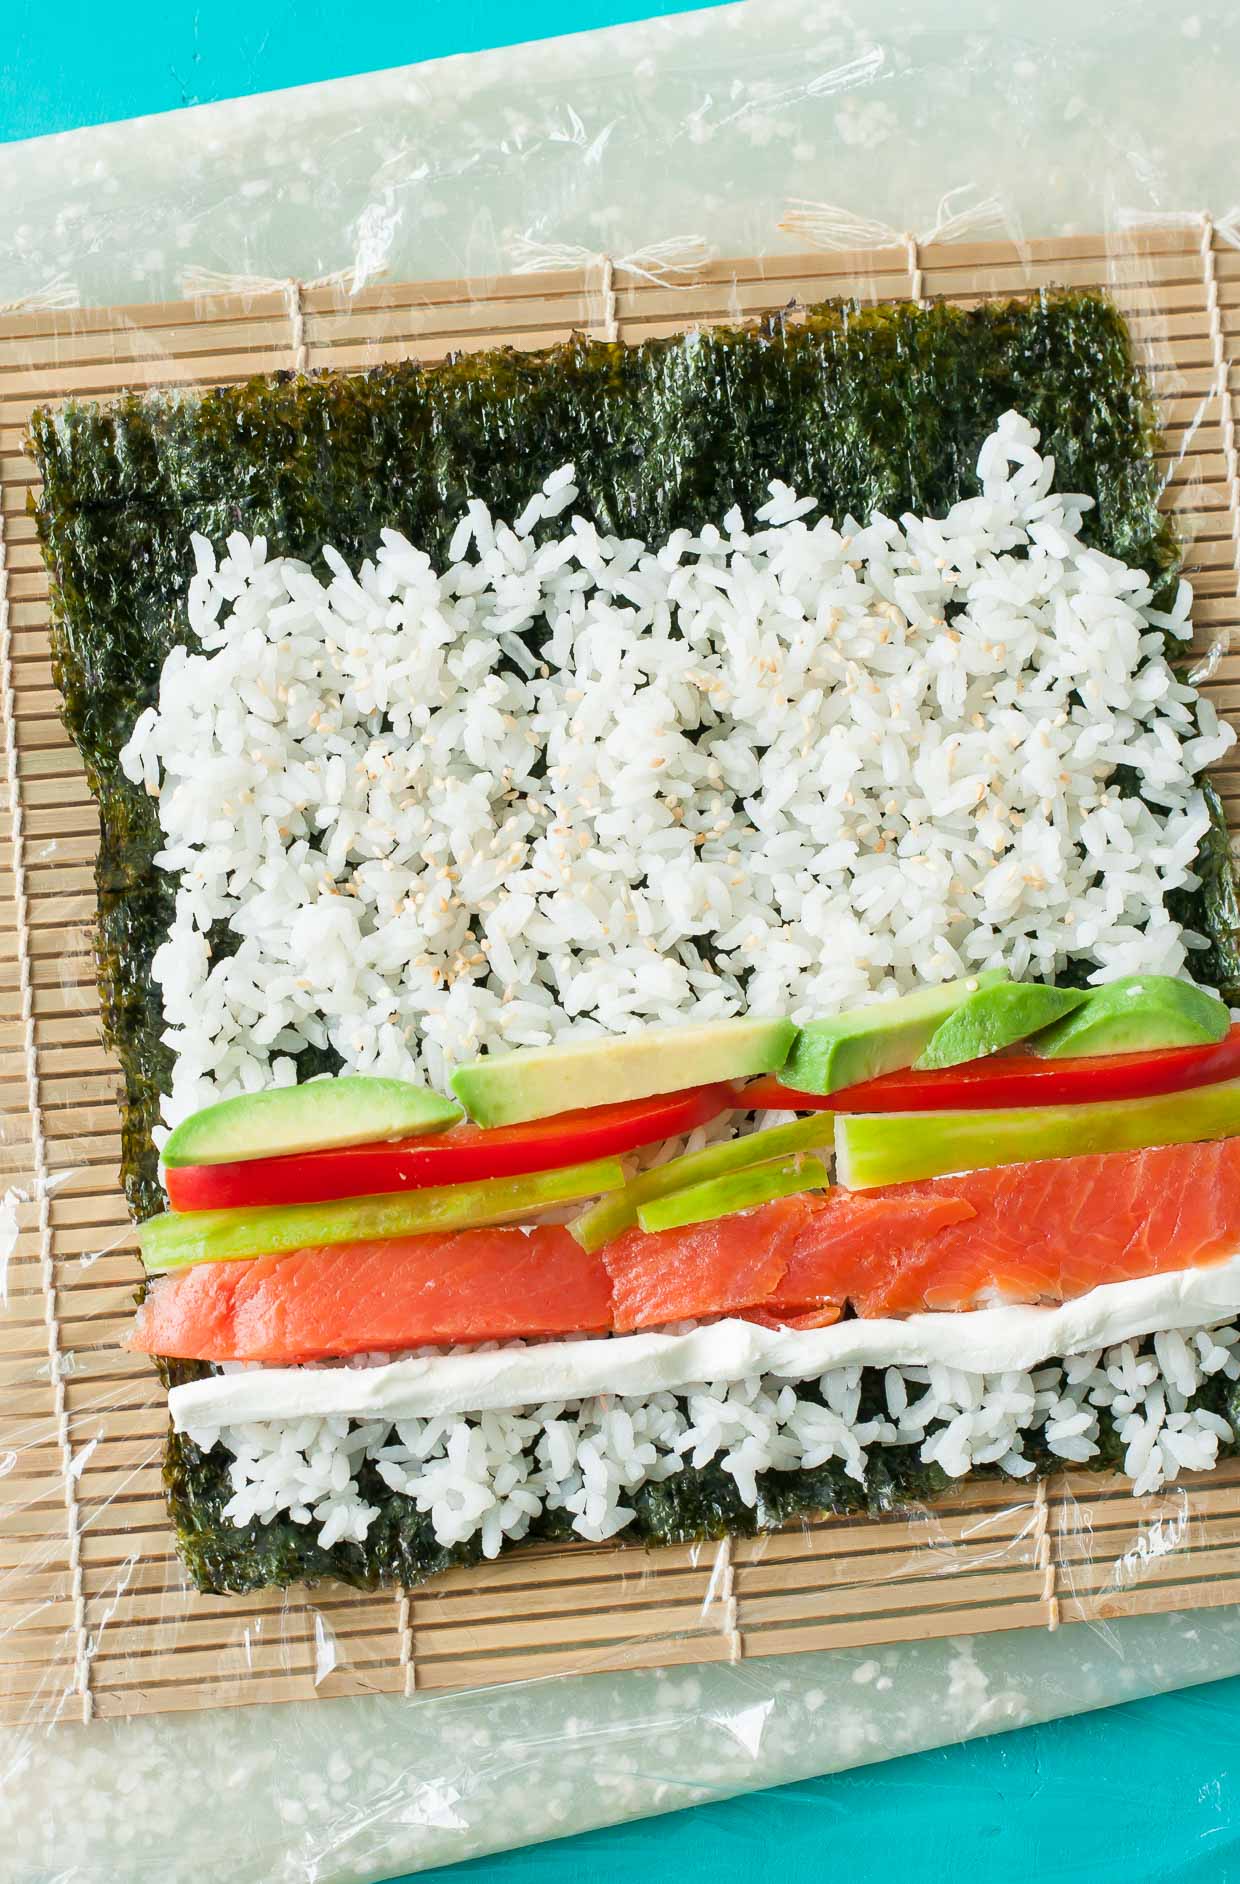
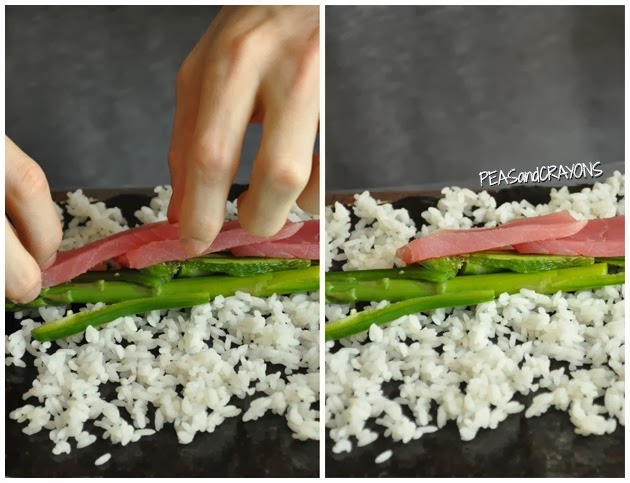
step 6 – line it up:
Place your toppings in the center, very close to one another. If you have large slices or an abundance of ingredients you may want to pile some on top of each other.
For rice on the inside: line your veggies +/or seafood on top of the rice
For rice on the outside: flip the sheet of nori so the rice touches the plastic wrap and then add your vegetables to the seaweed-only side.
step 7 – roll, squeeze, repeat:
This one’s hard to explain… but it’s easy to do! The first roll will bind the ingredients into the center. Roll approx 1/4 of the mat and gently squeeze (so it sticks) and unfold the bamboo mat. Repeat the process until you’ve rolled the sheet of rice, seaweed, and veggies into a spiral. Give it one last squeeze to seal the deal.

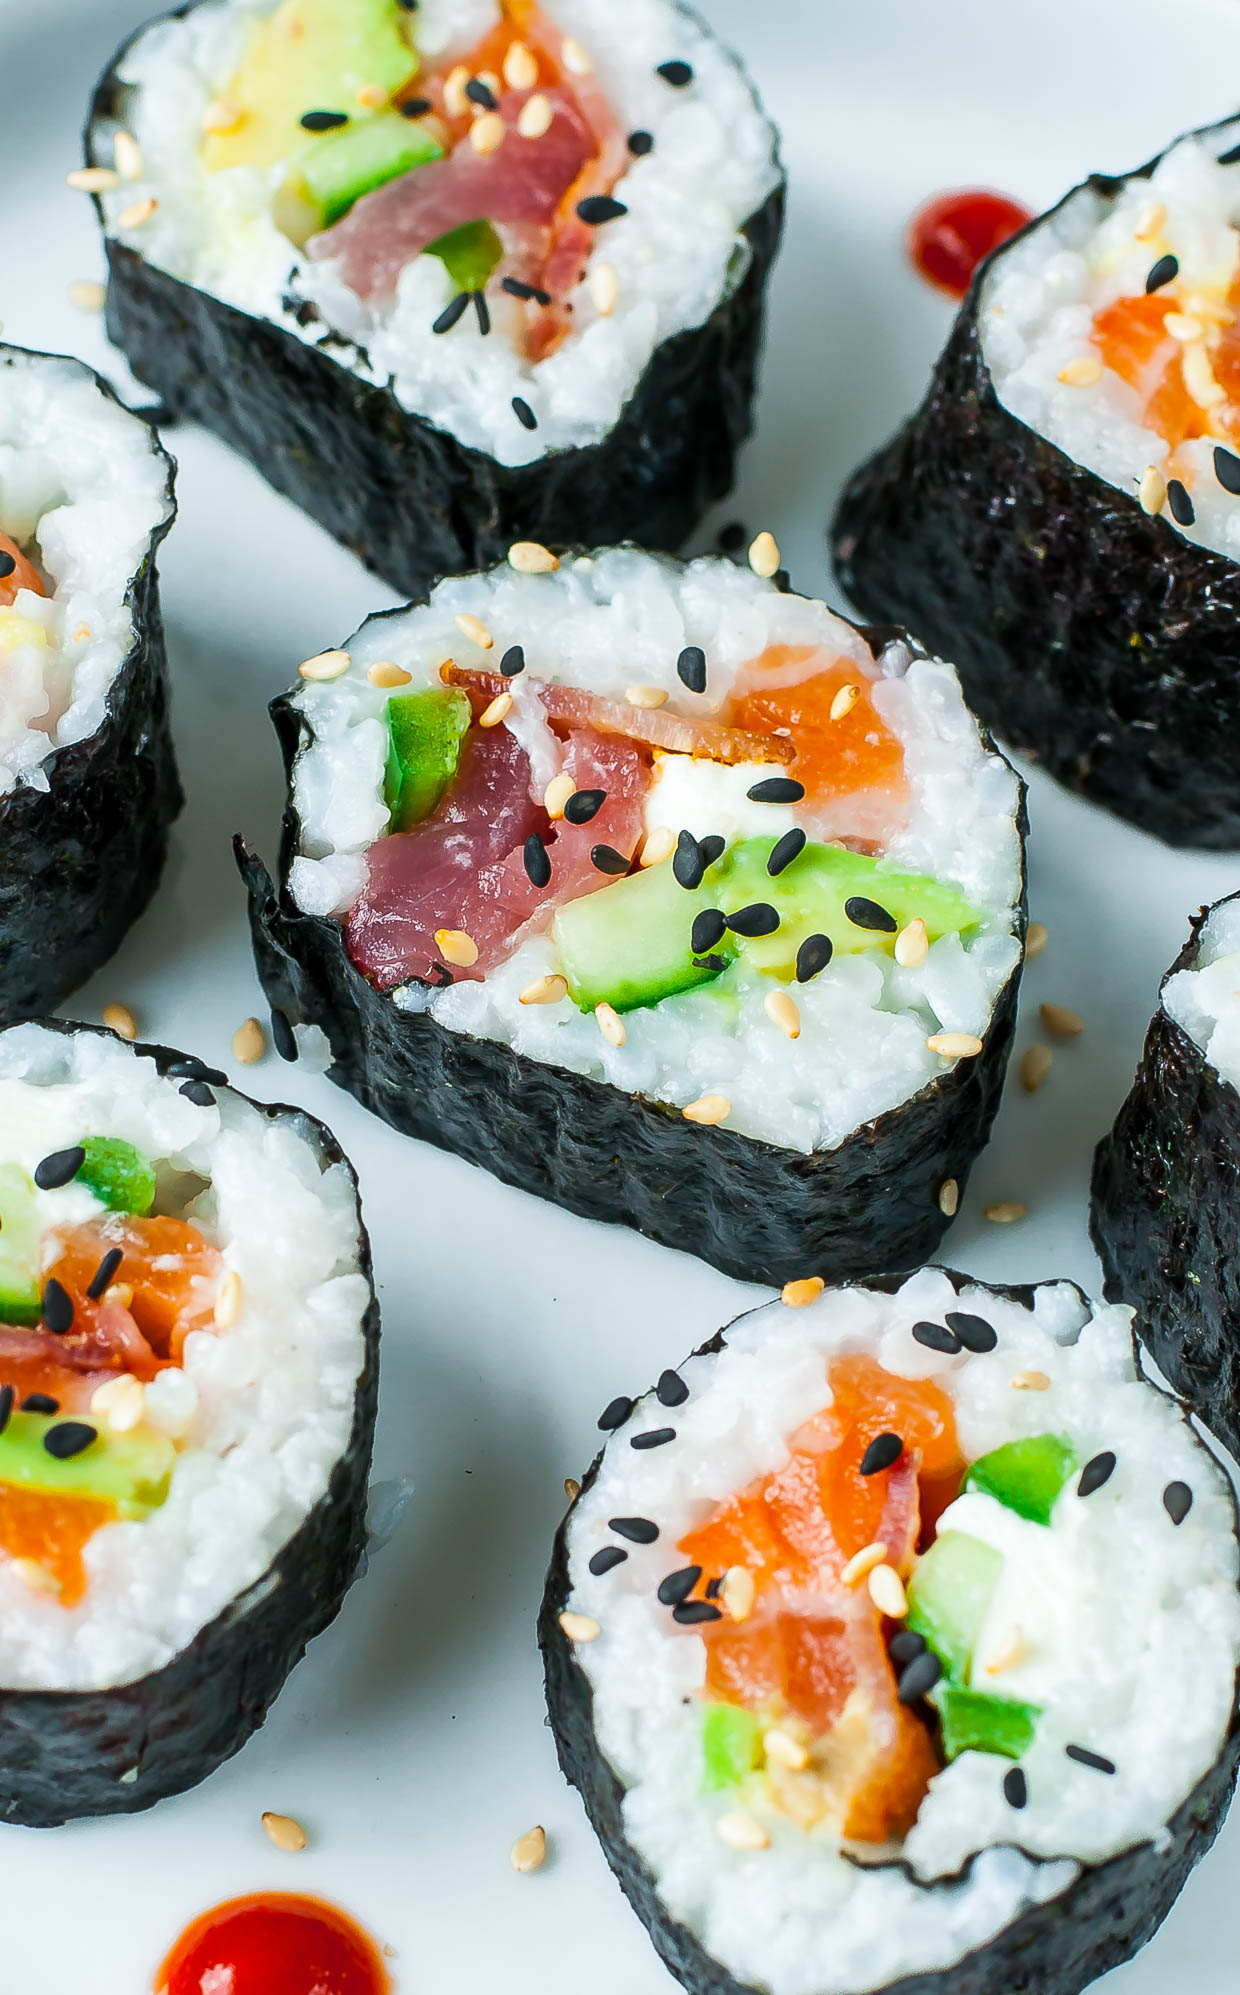
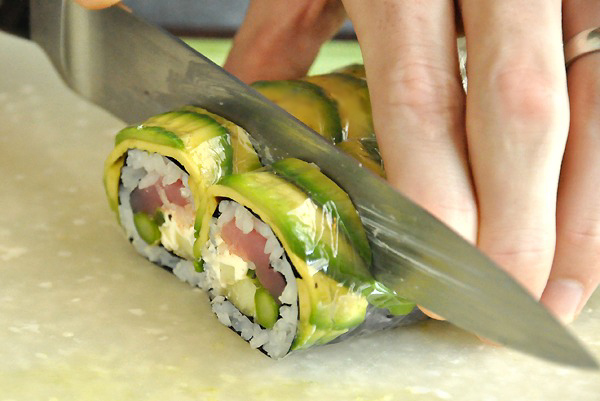
step 8 – slice and serve:
Slice into bite-sized discs with a freshly sharpened chef’s knife. If you’re topping your sushi with sashimi or avocado, first tightly wrap the roll in plastic wrap prior to slicing. This will keep everything neat and pretty an avoid the horrific act of flinging avocado slices all over the kitchen. Though if that sounds like fun to you, fling away! I’ll stick with the saran wrap 🙂
Next pile on your toppings (see below!) and set up a few sauces for dunking.
Well, do that after you steal the end pieces off the roll (they’re always the messiest!) and shove them in your face!
We LOVE making this homemade sushi and hope y’all do too!
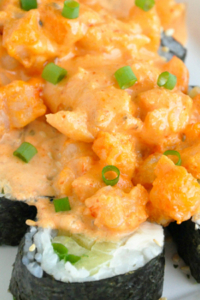
tasty toppings:
- chia seeds
- sesame seeds
- thin slices of fish
- shrimp or crab salad
- sliced almonds
- crushed pecans
- spicy baked seafood
- sliced mango
- chopped green onion
- seaweed salad
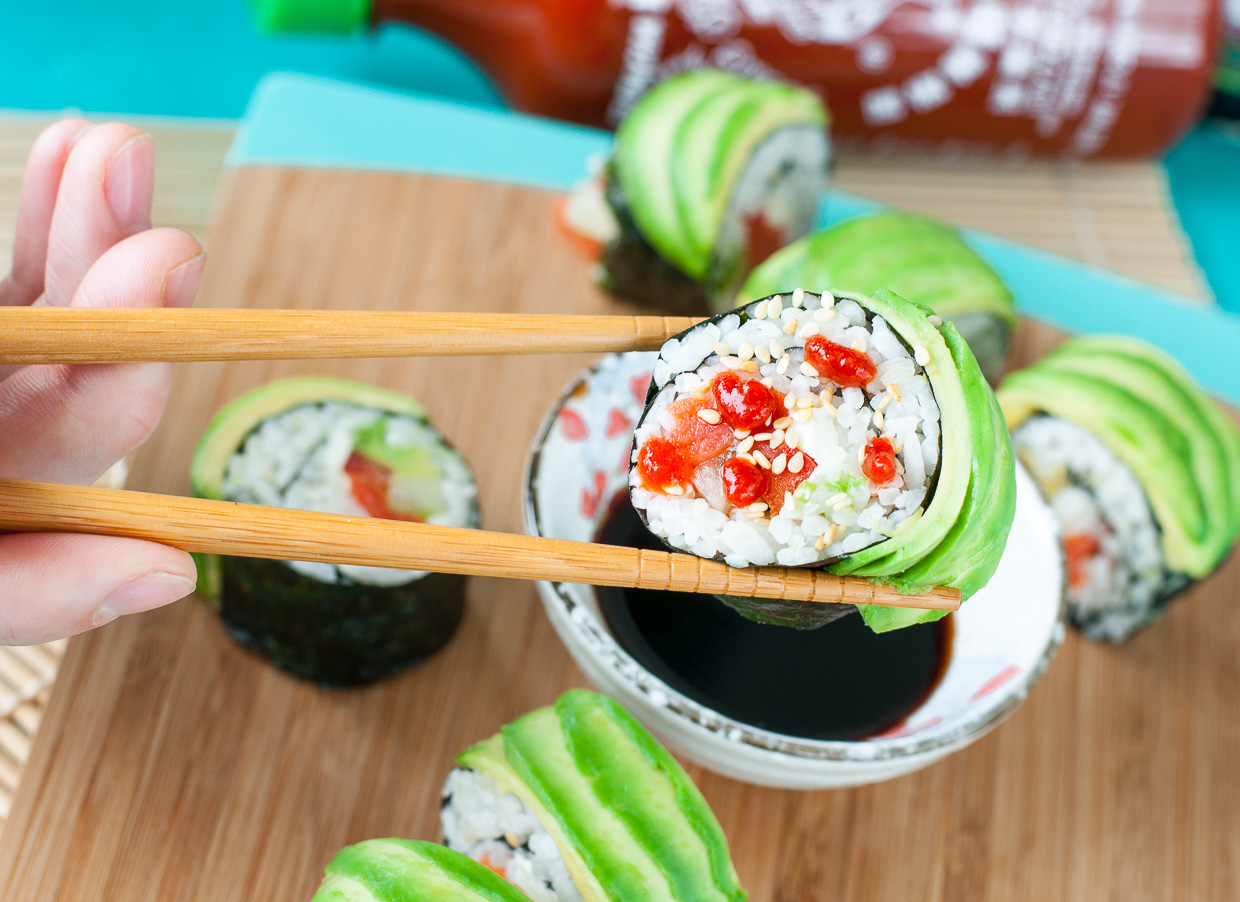
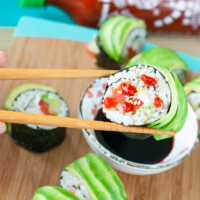
- and my favorite topping… avocado!
Want to learn how to wrap your sushi rolls with fresh avocado? (click for tutorial) It’s actually pretty easy!
homemade sushi sauces
We can’t have homemade sushi without some not-so-secret sauces!
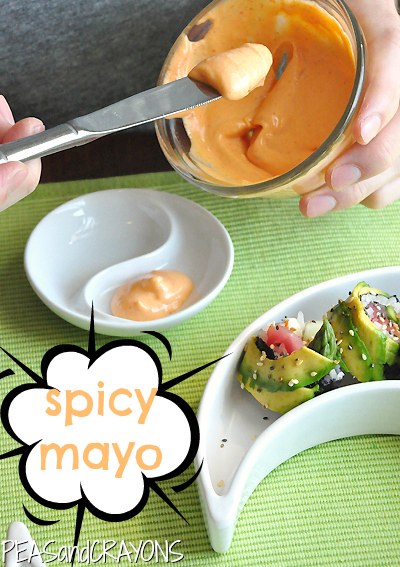
spicy mayo:
- 1 TBSP homemade or store bought mayo
- 1/2 TBSP sriracha chili sauce
Adjust to your ideal heat level from mild to unreasonably spicy! Substitute with vegan mayo or plain greek yogurt if needed.
eel sauce:
- 1/4 cup mirin (Japanese white wine)
- 1/4 cup low sodium soy sauce
- 2 tablespoons sugar
Heat in a sauce pot over medium heat, whisking constantly to thicken. (approx. 10 min)
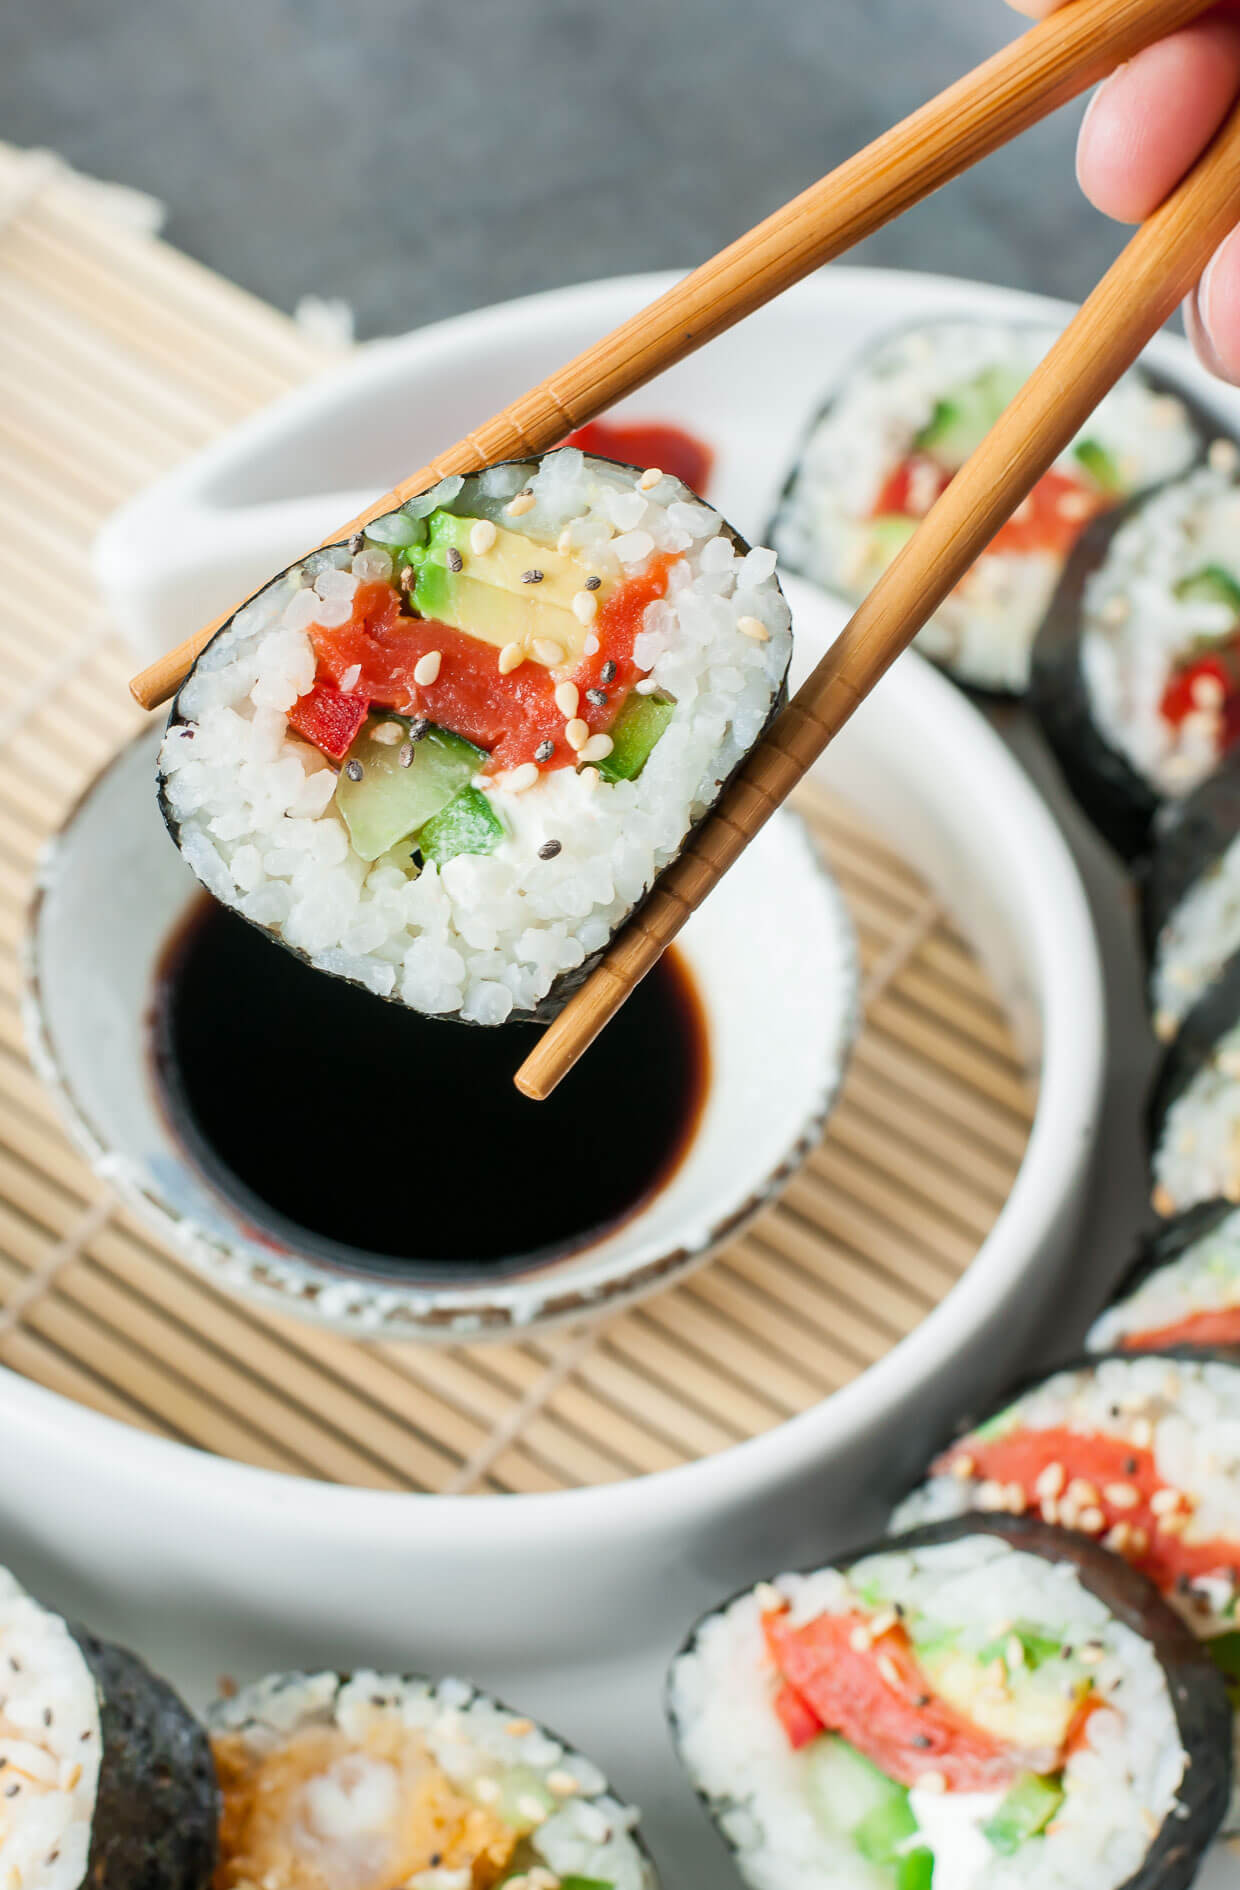
soy sauce:
Opt for low-sodium when possible; gluten-fee versions available.
ponzu sauce:
Ponzu is a citrusy soy sauce with lemon or lime added. May be purchased or easily imitated by adding fresh juice or zest to your favorie soy sauce.
sriracha chili sauce:
Give your tastebuds a run for their money with straight-up Sriracha. May be added to soy sauce, served on the side, or served straight up on your sushi!
Add a little, or a lot!

Why are you still reading this? Go make some homemade sushi!
Here’s your printable cheat sheet:
Homemade Sushi: Tips, Tricks, and Toppings!
Ingredients
sushi-making staples:
- sushi rice
- bamboo sushi mat
- plastic wrap (cling/saran wrap)
- nori seaweed sheets
- low-sodium soy sauce
- toasted sesame seeds
- Sriracha
- wasabi + pickled ginger
STELLAR SUSHI INGREDIENTS - CHOOSE YOUR FAVORITE FILLINGS
- cucumber
- avocado
- asparagus
- jalapenos
- green onion
- carrots
- sprouts
- bell peppers
- pineapple
- mango
- apple
- pear
- tempura [cooked] shrimp
- imitation crabmeat [cooked]
- raw sashimi grade salmon
- smoked salmon
- raw sashimi grade tuna
- and the list goes on and on!
TASTY TOPPINGS
- sesame seeds
- thin slices of fish
- shrimp or crab salad
- seaweed salad
- sliced almonds
- sprouts
- thinly sliced avocado
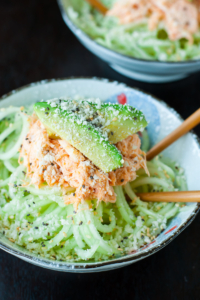
- volcano topping
Instructions
- STEP ONE: Make your sushi rice on the stove top or using a rice cooker. Quinoa works excellent too!
- STEP TWO: Season the rice with seasoned rice vinegar or a combination of plain rice vinegar, sugar, and salt. Pour over your rice, fluff with a fork, taste, and adjust as desired. Remove rice from heat, fluff into a bowl and set aside.
- STEP THREE: While the rice cooks/cools, prep your veggies! Slice into matchsticks and set aside. Once the rice is done you'll be ready to roll!
- STEP FOUR: To avoid messy clean-up and scrubbing, wrap your bamboo mat in plastic wrap. Lay a sheet of nori on top and grab your rice!
- STEP FIVE: Use a spoon to spread a thin layer of rice on the seaweed sheet.
- STEP SIX: Place your toppings in the center, very close to one another and practically in a little veggie dogpile.
- For rice on the inside, line your veggies/seafood on top of the rice.
- For rice on the outside, flip the sheet of nori so the rice touches the plastic wrap and then add your vegetables to the seaweed-only side.
- STEP SEVEN: roll, squeeze, repeat: This one's hard to explain... but it's easy to do! The first roll will bind the ingredients into the center. Roll approx 1/4 of the mat and gently squeeze (so it sticks) and unfold the bamboo mat. Repeat the process until you've rolled the sheet of rice, seaweed, and veggies into a spiral. Give it one last squeeze to seal the deal.
- STEP EIGHT: Slice into bite-sized discs with a freshly sharpened chef's knife. If you're topping your sushi with sashimi or avocado, first tightly wrap the roll in plastic wrap prior to slicing. This will keep everything neat and pretty an avoid the horrific act of flinging avocado slices all over the kitchen. Though if that sounds like fun to you, fling away! I'll stick with the saran wrap!
- Next pile on all your favorite toppings and set up a few sauces for dunking.
- Enjoy!
:: pin it for later ::
Be creative! there are endless combinations of ingredients, toppings, and sauces to choose from!
If you get a chance to try this homemade sushi tutorial, let me know! You can leave me a comment here (LOVE checking those daily!) or tag @PEASandCRAYONS on Instagram so I can happy dance over your creations. I can’t wait to see what you whip up!


Loved all the tips… thanks.. turned out awesome 👏🏻
Amazing! Thank you!
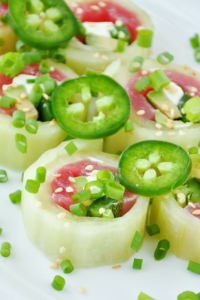
For a no rice healthy roll here is at tip. Use a English Cucumber to make the “nori sheet”. I use the vegetable slicer attachment for my Kitchenaid Mixer. It cuts the cucumber very thin and then I fill it with all the ingredients. Roll like usual. Space about 5 toothpicks through the roll and then cut between each toothpick. Really delicious without all the carbs.
Yesssss! Love doing this! I have a little tutorial here on the site from back in the day – it’s so refreshing and light!
Do you prefer cucumbers or no cucumbers in your sushi?
I’m team cucumber! I always include them along with, when I have them, avocado and matchstick sliced jalapeno.
I do not like the nori seaweed sheets. Can I substitute with rice paper?
Hi Sharon! Usually restaurants use a type of thin soy wrapper to replace the nori – I haven’t tried rice paper yet but let me know if you get a chance to experiment! xoxo
Spring rolls are basically sushi veggies wrapped up in rice paper, so this would totally work. Be careful with the rice paper though… it can be a bit difficult to work with because it sticks to itself .
how to make sushi inner ingredions
Hi Frisco! The inner ingredients are all listed out in the blog post. You can choose your favorites and mix and match. If there is a particular roll you’re looking to recreate at home just let me know and I can help you choose what to add to it. xoxo
Is it possible to make the rice and put it on the nori and store it until the next day without the rice getting hard or the nori texture being compromised? I am looking to make this for a crowd and want to get ahead the day before and just roll them the next day.
Hi Steve! I am not a fan of premade/chilled sushi rice as it always does exactly that. I’ve read on a few culinary sites that when storing just the rice in an airtight container in the fridge you can revive it by microwaving on lower heat slowly with a damp paper towel over the top of the bowl to gently add moisture to the rice and fluff it back up. This would not work with rice already spread nori however.
The best tutorial on making Sushi ever..!
Totally understood and enjoyed it..!
Keep up the good work..!
Cheers
It was very awesome how you made it.. Thanks for the step by step instructions ❤️
You’re super welcome! xo
When rolling the sushi, you wrap the roll in saran, and then cut slices?
Hi Brenda! So for the avocado wrapped rolls I cut through the saran and then peel each little wrapper off. It’s a trick I learned from the sushi chefs at a fav restaurant! For the regular rolls the saran is just there to keep the sushi mat clean of rice and seaweed and make it easy clean-up. You won’t cut through it in that case and don’t need to use it either if you don’t mind washing up the sushi mat after rolling all your sushi. Hope this helps! xoxo
THIS IS AMAZING i couldnt belive it they were so good and yummy, my kids loved them!!!
Try spicy tuna salad rolls…1 can of tuna, drained well,2 tbsp mayonnaise, a dash of hot chili oil or Tabasco sauce. Spoon into where you would usually place fillings and roll up…yummmm
It helps to dip your finger in a small bowl of water and moisten the end of the nor I prior to rolling so it sticks. Also, try this dipping sauce…1/4 cup soy sauce, 1 tsp sugar and about 10 drops of toasted sesame oil
First timer. Can I make them the day before
Hi Mary! Sushi is best eaten right after it’s made. I don’t recommend making it in advance; however, you could slice and prep the veggies in advance.
Yes, as long as it doesn’t have avocado, because that turns brown quickly. Try to make it as shortly before you plan to serve it
This answers all the mystery. Imma do this with my littles while we are stuck at the house and save me $90 on sushi at the local yummy place I go. <3
So glad this tutorial helped. Have a great time making sushi with the kiddos! xoxo
How much rice ? Measurements?
Hi Neha! For 2 sushi rolls you will need 1/2 cup uncooked sushi rice, 1 cup water, and 1 TBSP seasoned rice vinegar. For 4 sushi rolls you will need 1 cup sushi rice, 2 cups water, and 2 TBSP seasoned rice vinegar.
Made your Volcano Roll and won the home sushi bar contest! And it’s nice to see an edited copy of Allie Brosh’s “—- ALL the Things”. original artwork. I miss her online presence.
I always cook better if there are pictures, and yours are SOOO helpful.
I’m so glad the rolls were a hit! Congrats on your win!!! Ohmygosh and I have Allie’s book – it’s always a fav to re-read and share with friends!
Hiii! Loved this! Question, where did you get that moon serving dish! I need it 🙂
So glad you loved the tutorial – thanks! The serving dish was one of those random TJMAXX finds and I wish I could track down the company that makes them to get another but it was unmarked.
I like it. Thank You & Regards.
This is so helpful! Thank you so much. My daughter’s favorite food is sushi and her birthday is coming up so I’m planning on making some sushi since I can’t take her to a restaurant because we are in ! I’m so excited!
So happy to help! Enjoy!
I loved your site on Sushi it was fabulous and we made awesome Sushi and Coconut Shrimp. Thanks for the easier prep and instructions. Making dinner on Friday with Family is special. Thanks for the easy list of ingredients and instructions. The Benfers in Saratoga Springs, New York.
Sounds marvelous! Glad the recipe was a hit!
Owo nice
I found sushi years ago. My favourite sushi roll is filled with smoked salmon and lightly scrambled egg. Funny thing is if boiled rice is put on my plate I won’t touch it. But made up as sushi I just can not get enough of it
That sounds like a fun sushi roll! And that is so funny about the rice! I think it’s better in sushi form too, haha.
How do tone down the salt
I have older senors that need no salt
Hey Don! The 3 main sources of sodium are the rice seasoning (via adding salt or using pre-seasoned rice vinegar), the nori seaweed sheets, and soy sauce. If you’re looking for a sodium-free food to serve, it may be a bit tricky with sushi. I’d opt for a sushi roll that is wrapped in cucumber like a Naruto Roll <-- we love this recipe!
I love how you get right to the point without any unneeded story.
ME LOVE SUSHI!!!!!!!!!!!!!!!!!!!!!!!!!!!!!
It’s an all-caps affair! WOOT!
I’m totally inspired to give this a try as sushi is a weekly tradition for my family but it really is so expensive! I love that you shared all the sauce recipes too! Now I just need to figure out how to do spicy tuny and soft-shelled crab, which are our two favorite proteins in sushi!
Thanks Amy! So excited for you to try this homemade sushi spread – it’s a lifesaver for us as our sushi addiction is strooooong! xo
Ooh and for spicy tuna, you basically buy sushi grade tuna steaks (fresh or thawed from frozen) and then mince it up real well with a drizzle or two (or three!) or Sriracha chili sauce to make it nice and spicy! I’ve seen thinly sliced jalapeño added too which is a favorite here!
I am stocking up for a sushi party for when my sisters come to visit! Can’t wait!
These tips are SO GOOD! My husband and I made sushi together for date night and these ideas definitely come in handy!
You forgot about yam and even zucchini which are both super tasty in sushi!!
Ohmygosh YES! I’ve used zucchini and even yellow rice in sushi before and it rocks my world! Good call Jess! 🙂
Hi, curious how rice this actually makes? Enough for two people, four people, etc?
Hey Becca! My husband and I usually split this when we’re super ravenous but I think in normal sushi world it would serve more. It’s enough rice for 4-5 sushi rolls total so you could serve up one roll per person if desired.
Can’t wait to try, made some before but didn’t think of chia vs sesame. A friend told me about mango, can’t wait
Ohmygosh Michelle for sure add mango to your sushi! It’s phenomenal! Hope the tutorial is a blast – we love making our own sushi! 🙂
this is the most comprehensive recipe/directions/photos ever! I now have the confidence to try it for myself. Thank you!
Thanks Jen!!! I hope it comes in handy! I adore making sushi at home with friends and family! <3
I just started making my own this past week and tonight for dinner 🙂 It is crazy easy to do! The rice is the only hard part! Haha. I forgot to pick up bamboo mats and plastic wrap and didn’t realize it until I had everything ready to go! Sooo… I cut open a Ziploc bag and it worked perfect! I would rather have used plastic wrap to top my rolls but maybe next time. Also as far as veggies, I love carrots but if you pile them too thick they are really hard to cut through! And for newbies, the inside out rolls are delicious but harder to eat with chopsticks, so stick to normal rolls or just eat with your fingers, it is totally acceptable! And one last thing… Sriracha is great on pizza 😉
I like to cut up my carrots and place them in a microwavable bowl with a little water and cook them for a couple minutes.
Love this tutorial…planning to have a sushi making dinner this weekend with my family!
I shred my carrots with a cheese grater!
Great idea!
I would suggest using a half sheet of nori instead of a full one. I always end up with the rolls being way too thick if I use the whole sheet. The sushi chefs at the restaurant I used to work at used half sheets. Just watching them at work, I picked up all kinds of ideas and tips.
Fabulous idea! I cover the nori with less rice to keep them small but I never thought to halve the nori! Thanks for the tip! =)
I tried to comment on this post from my phone the moment you posted it- but it didn’t work. So, I’m back.
This post is BEAUTIFUL!! I’ve made sushi at home a few times, but it’s been a while- I need to bring it back! We had a sushi making party one night, and it was a blast!
And you’re right about using plastic wrap- total life saver!!
Thanks Lauren!!
This is a great tutorial Jenn! My favorite sushi is salmon rolls! I have to have soy sauce to dip it in to as well!
Ahh this is great! I have been wanting to make sushi for a couple of weeks but couldn’t find a good recipe, so this is perfect and just in time haha!
Oh your sushi looks perfect! Next you’ll be opening your own store ;P
I actually don’t like sushi (which I suppose is good as I can’t eat soy or seaweed haha)
I love how you always seem to make my life so much simpler. I mean … I can do this at home?! DONE! Oh and next time there is a man in my life, I’m totally impressing him with these skills. Who wouldn’t want a girl who knows how to make sushi?!
Although I’ve never been a huge fan of sushi, you make it look very appetizing. I think we have the same addiction to sriracha…it pretty much accompanies most things on my plate
Ok, I’m going to do this. As you know, me and mine spend entirely too much $$$$$$ on sushi.Fantastic post BTW.Do you know how to make the spicy salmon? Can you post it?
Hands down fave sushi roll ever is Sex on the Moon from Lemongrass. Every time I try to be unpredictable and order something different, I just end up regretting my decision and dreaming about the Sex on the Moon roll and apologize for cheating on it with another less sexy roll.
This is an awesome tutorial, way to go! I love making Sushi at home, but somehow I end up making a huge mess.
Omg, obsessed! I have been dying to make homemade sushi!
My all time favourite – Shrimp Tempura, Cucumber, Avocado topped with Raw Spicy Tuna & Green Onions and drizzled with spicy mayo.
Spicy mayo (made with greek yogurt) makes a great bbq sauce – especially on chicken!
i always wondered how they made sushi! it looks pretty easy! thanks for sharing! (:
You are so ambitious. I want to have a sushi making date but I’m pretty sure if anybody could screw it up, it would be me. 🙂
Love this. Sushi is so good.
must procure me a mat for making….
Yummmmmmm. I wanna make my own sushi for sure now!! My fave has to be a good veggie sushi roll. So serious about making my own now though haha
This is awesome! I’ve been wanting to try this for ages! Even bought a book on it. But it doesn’t have pictures and your step by step pictures make it seem way less intimidating!
Thanks Jane! Once you dive in it’s fun! I hope this helps you get started! =)
It’s actually fairly easy and not time-consuming at all, as long as you have a rice cooker. I like to set it and forget it.. It’s not like you have to actively stand there while the rice cooks 🙂
Also, my biggest tip would be – I kept squishing my rolls with even my sharpest knife, and one of my Japanese friends told me to stop being such a pain about it, and use a sharp, serrated bread knife, like every Asian family actually does at home. Haha. You can’t tell the difference at all, as long as it’s sharp and with wet vinegar helps.
Im having fun right now getting better at half-sheet rolls. They’re so tiny and cute, and actually more filling than they look. You have to be really cheap about the filling… Use less rice and keep more goodies. You can make about 10 whole rolls from 2 cups of rice, and bonus – they’re really cute! (Also there is less nori sheet in each roll, which personally I prefer to taste less of)
I need to try the half sheet trick! And HECK YES on the serrated bread knife! My husband rolls his eyes but I’ve been using it lately and it’s AMAZING! Love these tips like woah! Thanks Jen! 🙂 Hope you’re having a rockin’ week! Come make sushi with me!
If you ever get good at the half-sheets, let me know. Sometimes I have trouble getting the nori to stick for some reason, even though I have gone nice and light on the filling, and it SEEMS like they should stick. There is a lot less margin for error, but they’re so darn cute when they’re done! (The ten rolls estimate from two cups, was two cups uncooked rice, and a guesstimate, sine I’ve never used it all at once, but should be at least 9)
And thanks for reminding me about the sugar part of the rice wine equation. I had completely forgotten to do that. Doh.
Also, you can always try something totally “wrong” if people or you don’t want to tempt fate with anything raw, because I like to make little pork strips in Yuzu citrus with green onions, or I chop up shrimp into small pieces and fry them with hot chili oil, and I often sub celery for cucumber. You can even make a steak roll with beef stops, green pepper and onions. 🙂
I like making sushi because it takes a little thought, and isn’t many calories for how filling it feels when you finally eat it! yay!
Oh, this looks so yummy. It looks so time consuming tho…. Where do you buy the sushi mats? And are you slicing the sushi thru the plastic paper?
The only time-consuming part is cooking the rice. I chop all my veggies and fish while I wait and then let everyone roll their own sushi when the rice is done! <3 It’s fun so it doesn’t feel like work at all. The mats are available everywhere! From target/wal-mart to grocery stores to international food stores. All should have em! <3
Thanks Kim!